A practical guide to securing your Synology NAS — from basic DSM security settings to more advanced options. No cybersecurity knowledge is required.
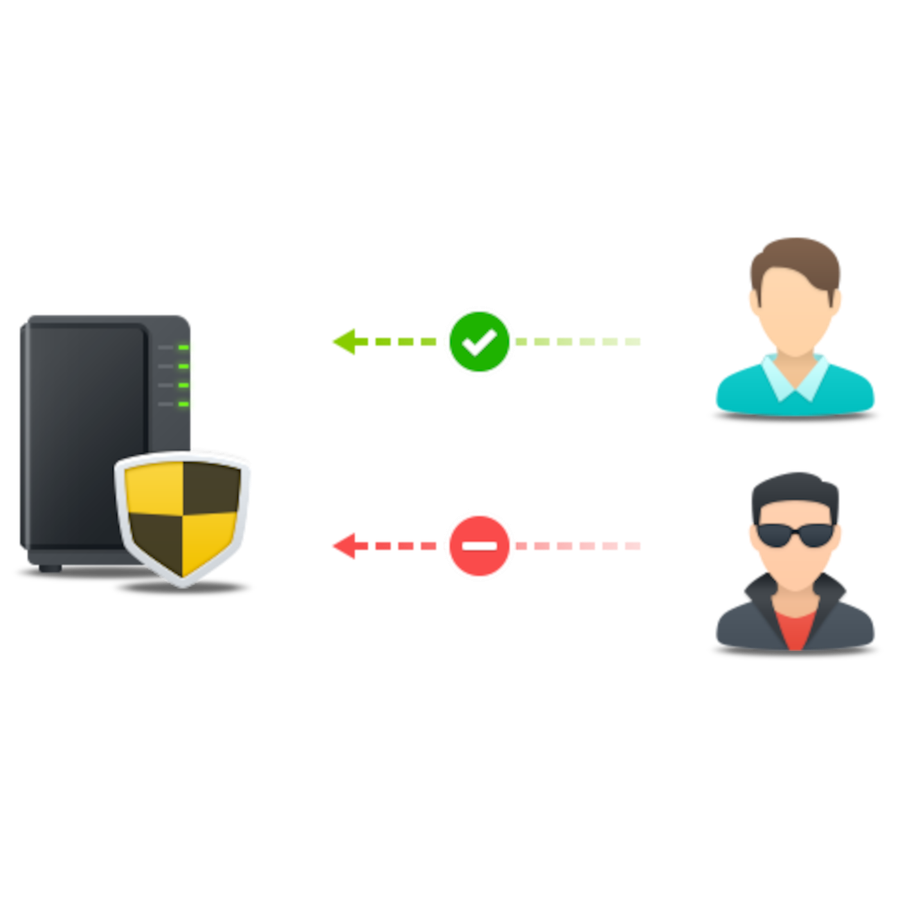
A NAS is not just a hard drive. It is a small server that is always running and often reachable from the internet. Before changing any settings, it helps to understand what you are protecting against.
A drive failure, a faulty update, accidental deletion or a ransomware attack — any of these can wipe out years of photos, documents, and backups in minutes.
Weak passwords, an exposed admin account or an outdated DSM version can leave your NAS vulnerable to brute-force attacks and ransomware.
Anyone who can remove a drive or take the whole NAS can bypass most software-based security measures.
This guide focuses specifically on the security of a home-use Synology NAS. The recommendations are intended as general best practices and may not be optimal for every environment.
These are the choices you make in the first ten minutes with a new NAS. Get them right and you've already closed off the most common attack path — the foundation of effective Synology NAS hardening.
After you install the drives and start the Synology DSM installer, one of the first and most important choices is the password for the administrator account. This password protects the whole system, so make it long and unique. Store it in a password manager instead of using a short password that is easy to remember. Avoid common usernames such as administrator, sysadmin, or support for admin accounts.
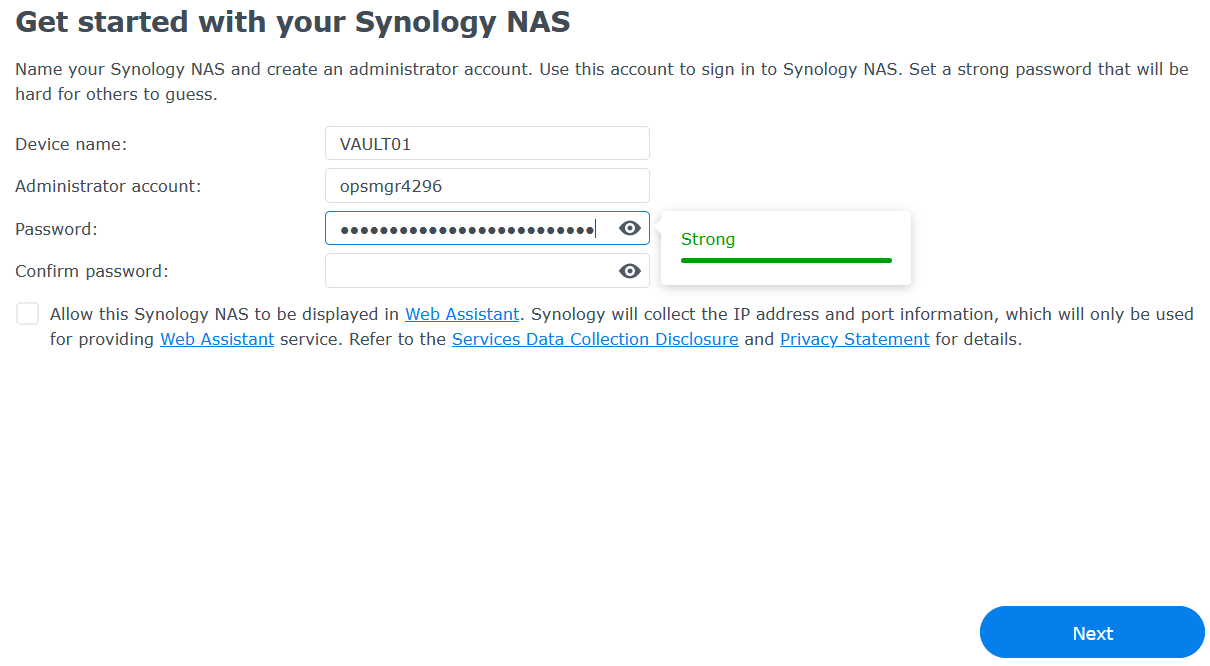
In the following steps of the installation wizard, you will encounter the following two important setup options:
Before you store any files, the choices you make in Storage Manager affect how well your data can survive a drive failure, silent corruption, or accidental deletion.
To start using the NAS, you first create a Storage Pool. For better data protection, choose a RAID type that can tolerate one or more drive failures without losing data. Keep in mind that RAID protects against drive failure, not against accidental deletion, ransomware, or a compromised NAS — that's what backups are for, as covered later in this guide. This is a deep topic on its own, but as a simple recommendation: use SHR (Synology Hybrid RAID).
Next comes the Volume. For general use, Btrfs is a good choice. It has several advantages over ext4, including the checksum and snapshot features covered later in this guide. You can read more about it on Synology's own Btrfs page.
Another important security choice is whether to encrypt the whole volume or only specific shared folders. The right choice depends on what you plan to store.
Under Storage, Data Scrubbing checks the data in a Storage Pool for inconsistencies and can automatically repair errors it finds. It is worth scheduling regularly to improve data integrity.
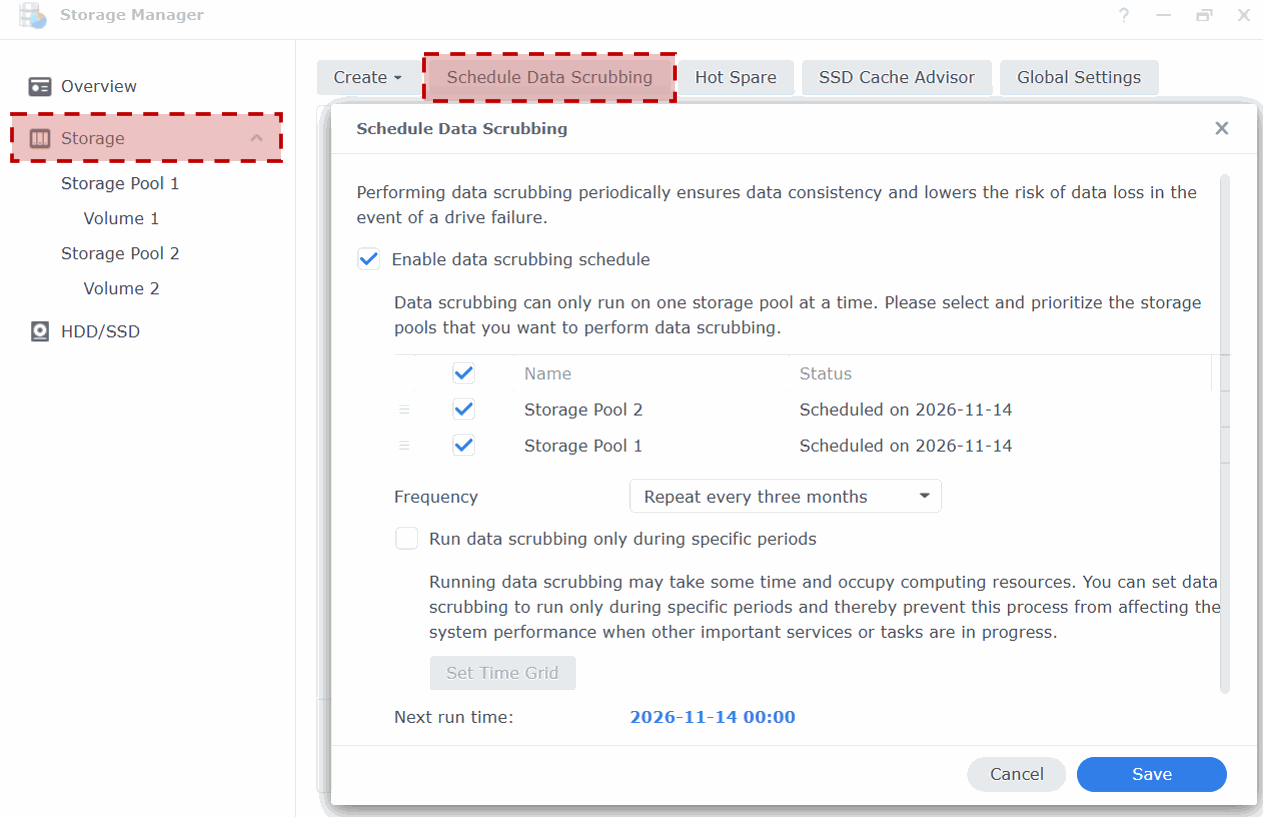
A Hot Spare drive stays unused until another drive in the pool fails. It can then be used to replace the failed drive without manual intervention.
Also set a low free-space alert per volume (Storage → Volume → ⋮ → Settings → Low Capacity Notification), so running out of room is never a surprise.
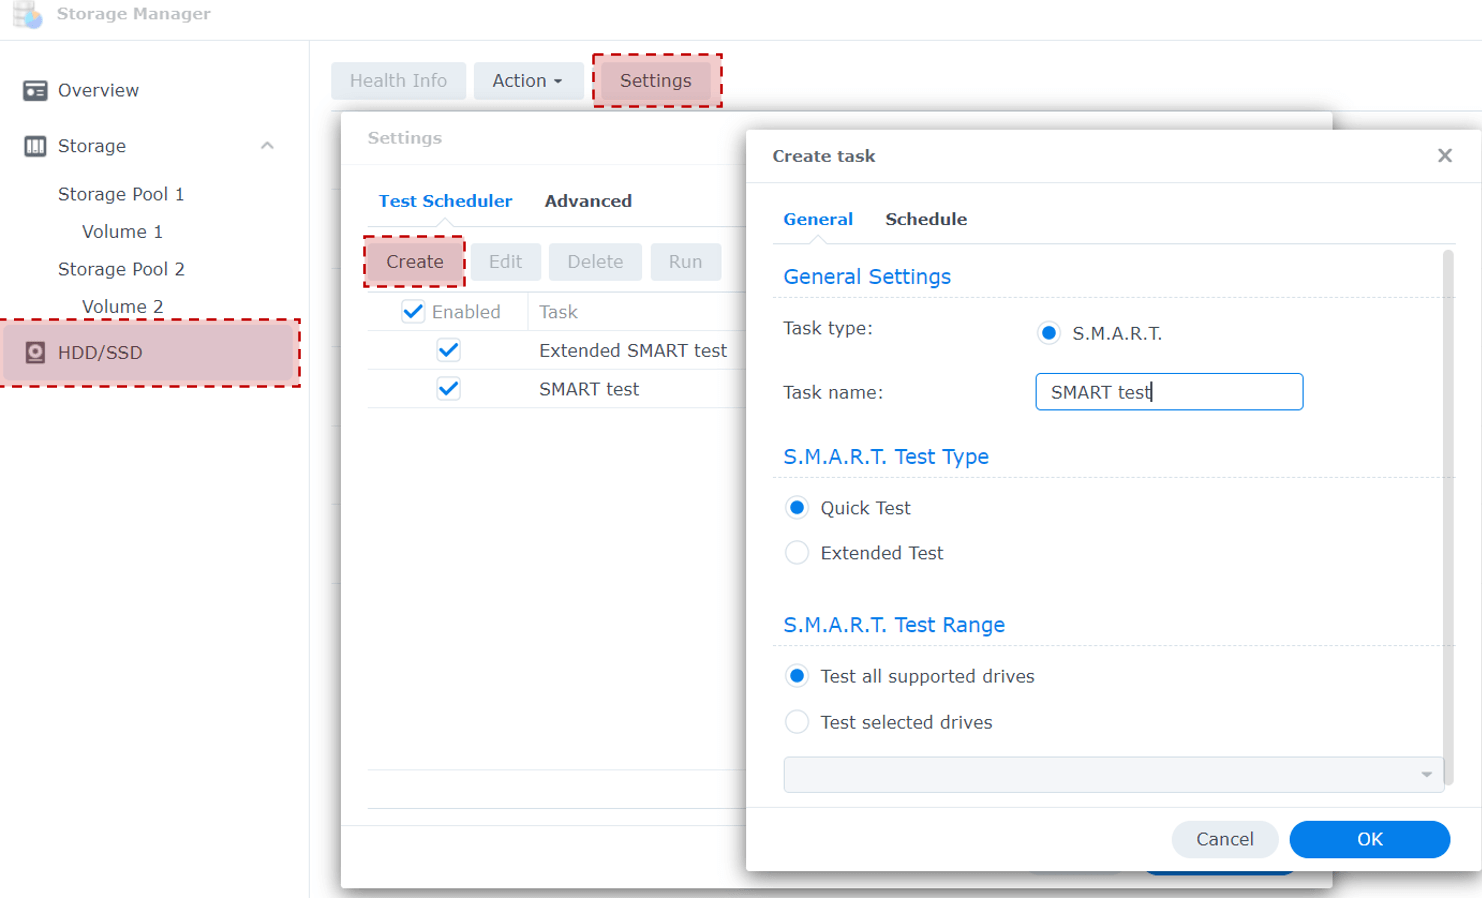
SMART checks the health of each drive, including power-on hours, unexpected shutdowns, and bad sectors. Under HDD/SSD → Settings → Test Scheduler, set up regular SMART tests and enable failure notifications.
If you plan to stop using or sell a drive, Synology can erase its data irreversibly instead of using a quick format. Go to HDD/SSD, select the drive, then choose Action → Secure Erase.
This is where most of the detailed security settings are found. There are thirteen groups of settings, each affecting your security exposure.
As a rule of thumb: always disable any service you don't actually need.
For example, if you do not need SSH or FTP, turn them off. This reduces the attack surface of your Synology NAS by removing services that could become security risks.

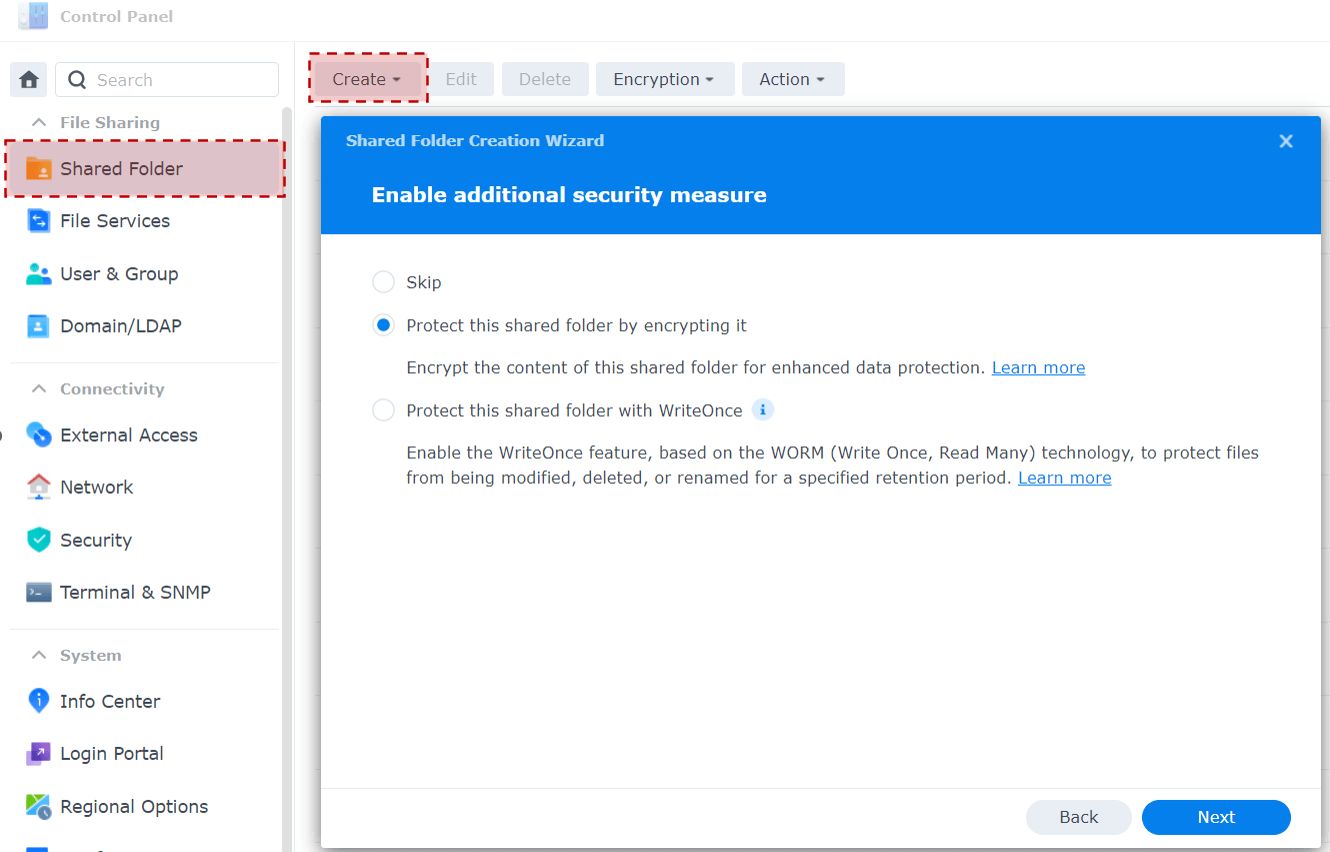
This is where you create the folders that actually hold your data. When you run Create → Create Shared Folder, a few checkboxes on the first screen are worth your attention:
#recycle folder.On the next screen you can turn on AES-256 encryption for the folder, protected by a password — make it a strong one. Encryption reduces performance, so skip it for folders that don't hold anything sensitive.
Checking "Add encryption key to Key Manager" stores the unlock key centrally so DSM can auto-mount the folder at startup. Otherwise, you'll unlock it by hand after every reboot. A .KEY file is also downloaded automatically when the folder is created. Keep it safe and secure, as it can be used to decrypt your data if you forget the encryption password you set.
You can also enable "Enable data checksum for advanced data integrity" (Btrfs only) — this computes a CRC32 checksum for every file so DSM can detect and repair silent corruption.
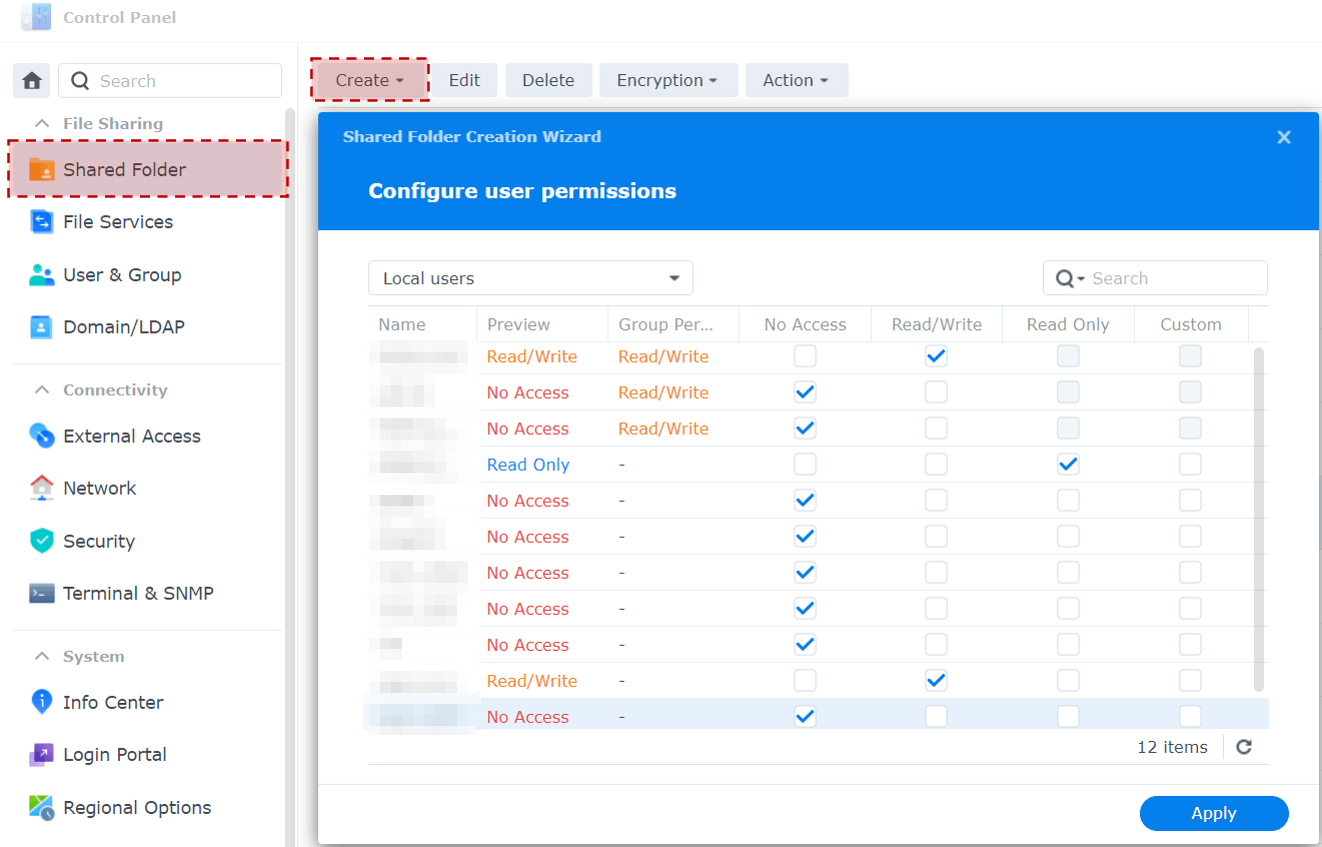
After creating the folder, a window pops up letting you configure who can access it — different users or groups. More on setting up accounts in 3.3 User & Group below. Follow the principle of least privilege: every user gets exactly the access they need, and no more.
Give exactly as much access as someone needs to do their job — don't grant write permission to a user if read access is enough.
Under Encryption → Key Manager you decide where unlock keys are stored: on the system partition, or — Synology's own recommendation — on a separate USB drive. The second option needs a strong password of its own, and you can enable "Eject device after boot" so the USB drive is detached right after startup.
Once that's set up, use Add to register further folders with Key Manager as needed, and tick Automount for any folder you want Key Manager to unlock automatically right after startup.

A NAS is useful because you can access your files over the network. This is where you configure the protocols used for that access. A few settings deserve special attention:
If you use SMB for local-network or VPN access, turn on "Hide shared folders from users without permission" so people can't even see folders they can't open.
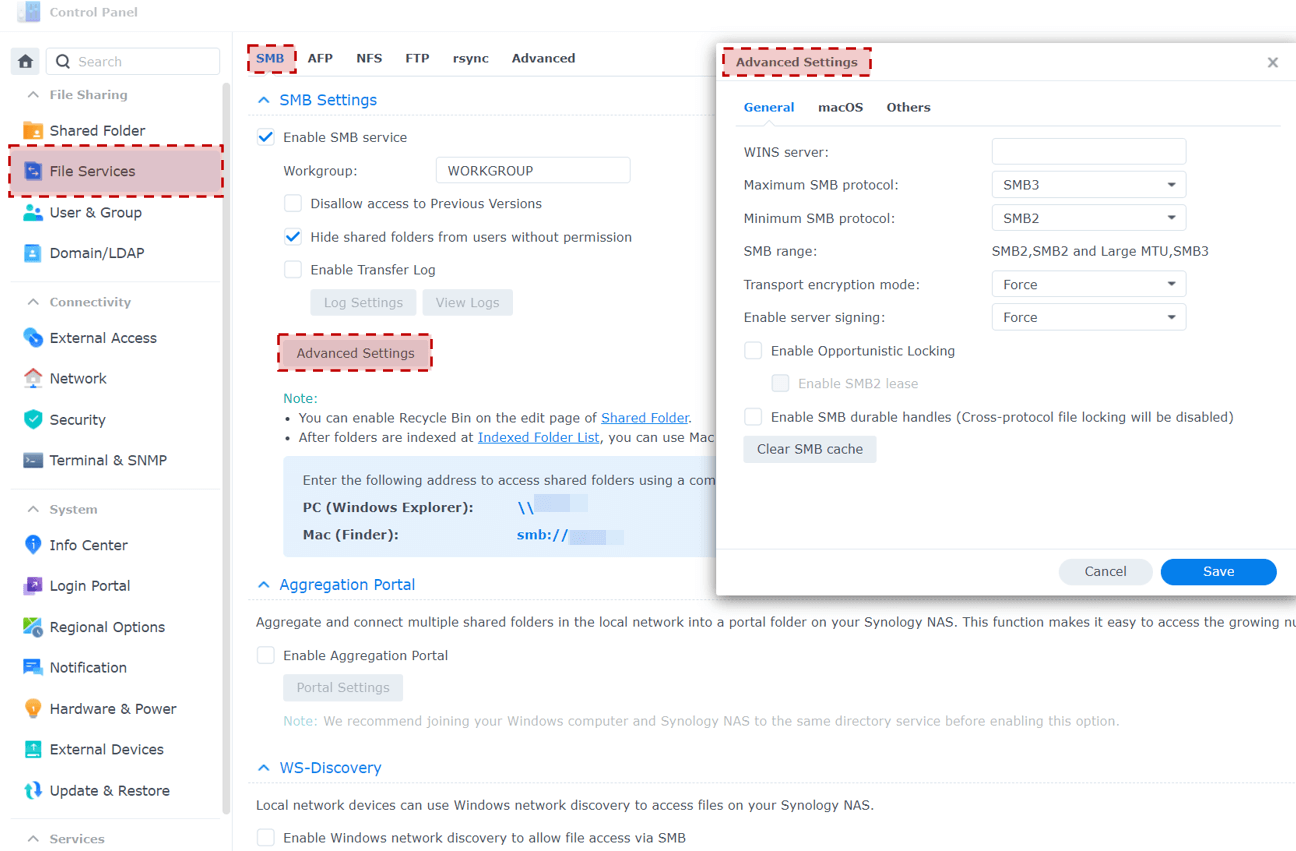
Both settings add some overhead, so file transfers may be slightly slower. You can also disable "Enable Windows network discovery to allow file access via SMB" if you do not need the share to appear automatically on Windows computers.

This is where you manage user accounts. A few simple practices can improve security:
When creating user accounts, apply the least-privilege principle. Using one admin account for everything is not good practice.
| Purpose | User account | Allowed apps |
|---|---|---|
| Accessing services from your phone | mobile | Drive, Photos, DS Video, DS Get |
| Accessing files from your laptop | notebook | SMB share access with write rights |
| Backing up the NAS itself | backup | SMB share access with read-only rights |
| Backing up your mom's computer | mom | Synology Drive access |
| Backing up your dad's computer | dad | Synology Drive access |
| Accessing movies from the TV | tv | DS Video with read-only rights |
| Full-access admin account | alice | Everything |
| Backup admin account | bob | Everything |
Structuring accounts this way limits the damage if one account is compromised. If malware gets onto one family member's laptop, an attacker can only access what that account has permission to use.
It is also worth keeping a secondary administrator account as a backup. This can help if your main administrator account is temporarily locked after too many failed login attempts.

The simplest way to reach your NAS remotely is QuickConnect, Synology's own zero-configuration relay. This guide does not cover QuickConnect configuration. Instead, it focuses on solutions that do not depend on Synology and rely only on your NAS and your own network.
Without QuickConnect, you'll need either a static IP from your ISP or a Dynamic DNS hostname, plus a port forward on your router pointing to the NAS. Choose your own external port — ideally something above 10000 — while the internal port stays whatever you use to reach the NAS in your browser (5001/HTTPS by default, and changeable under Advanced). Avoid exposing the plain HTTP port; it carries unencrypted traffic.
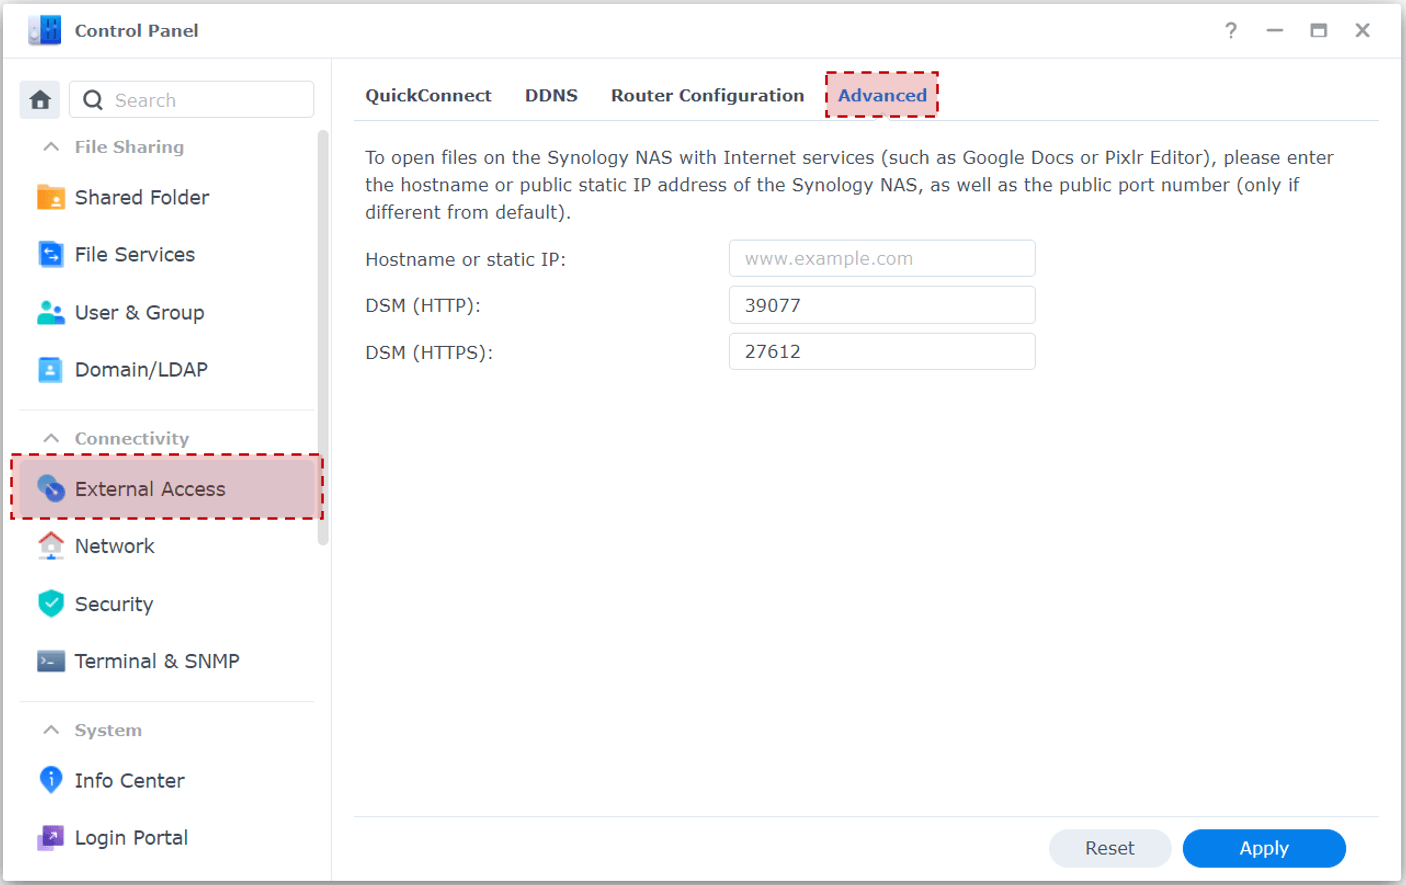
For the highest level of security, keep the NAS inaccessible directly from the internet, and allow access only from the local network or through a VPN. Synology's own VPN Server package (from Package Center) is one option; if you're comfortable with Container Manager, running WireGuard in a container is another popular, lightweight way to get secure remote access without exposing the NAS itself.

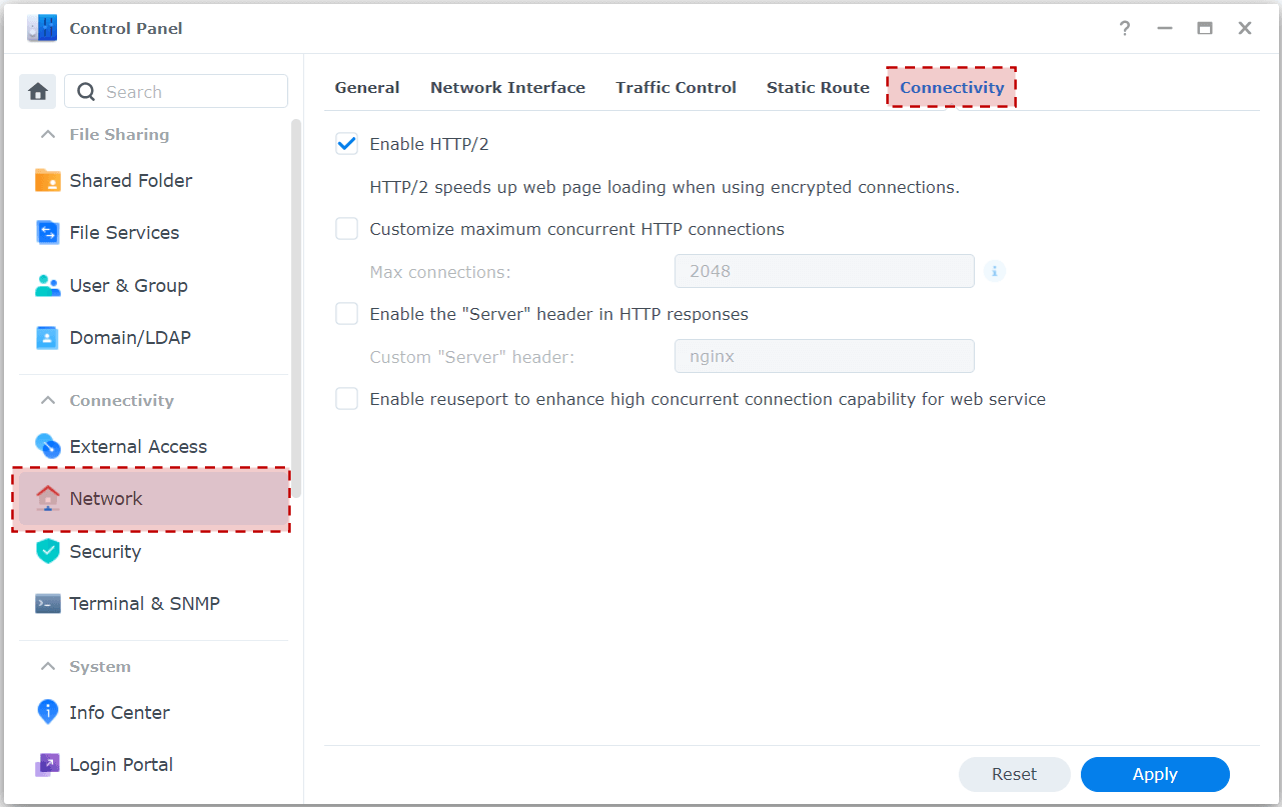
Most network protection is configured on the router rather than on the NAS, but two settings under Connectivity are worth knowing:

This is one of the most important areas in the guide. On the Security page:
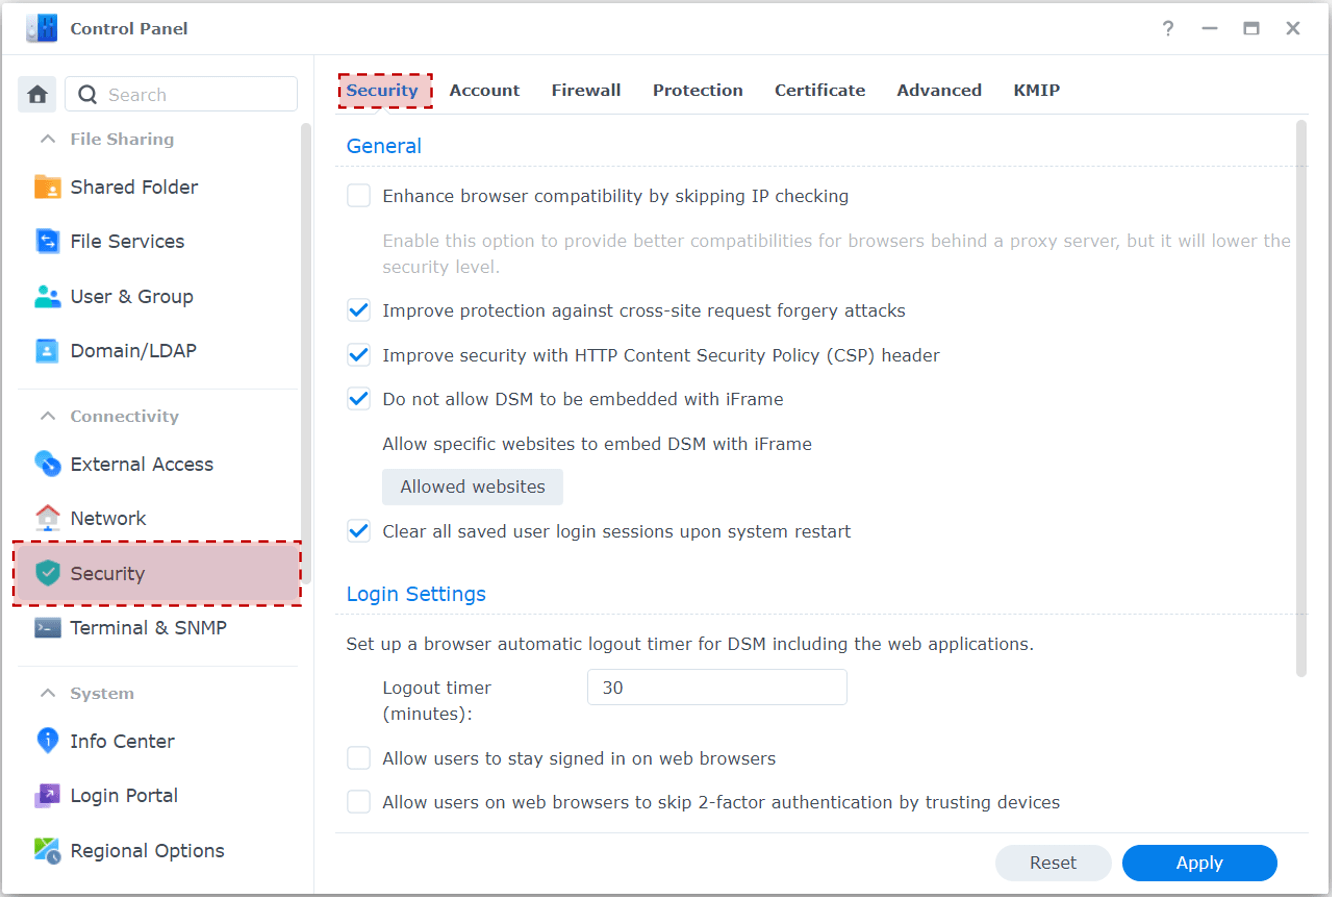
Passwords alone don't provide strong security — using multi-factor authentication (MFA) is a baseline requirement for every system that matters.
Under Account, enforce Two-Factor Authentication (2FA) for every account. For administrator accounts, Adaptive MFA adds an extra check when a login looks unusual.
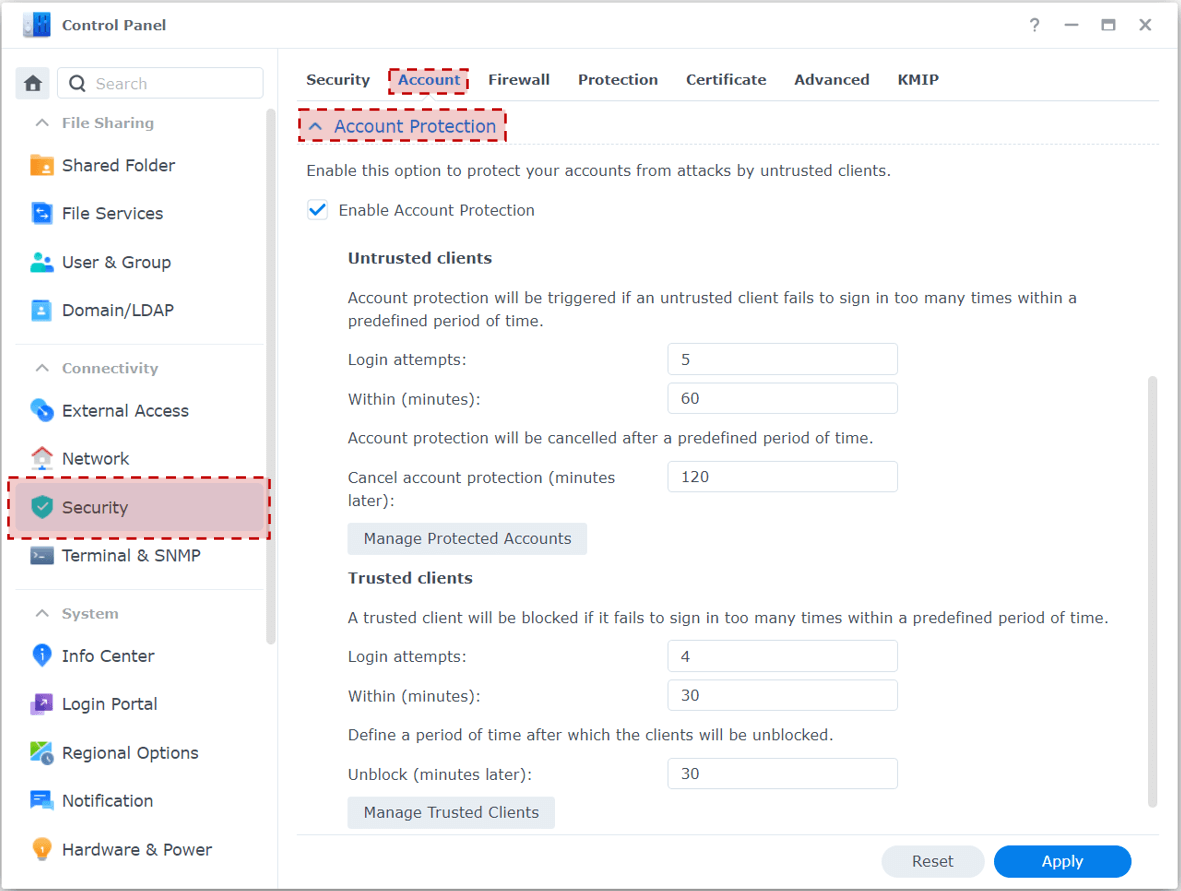
Account Protection temporarily locks an account after repeated failed logins — useful against distributed attacks. For example, you can configure it to lock an account for one hour after 5 failed attempts within 10 minutes, even if the attempts come from different IP addresses.
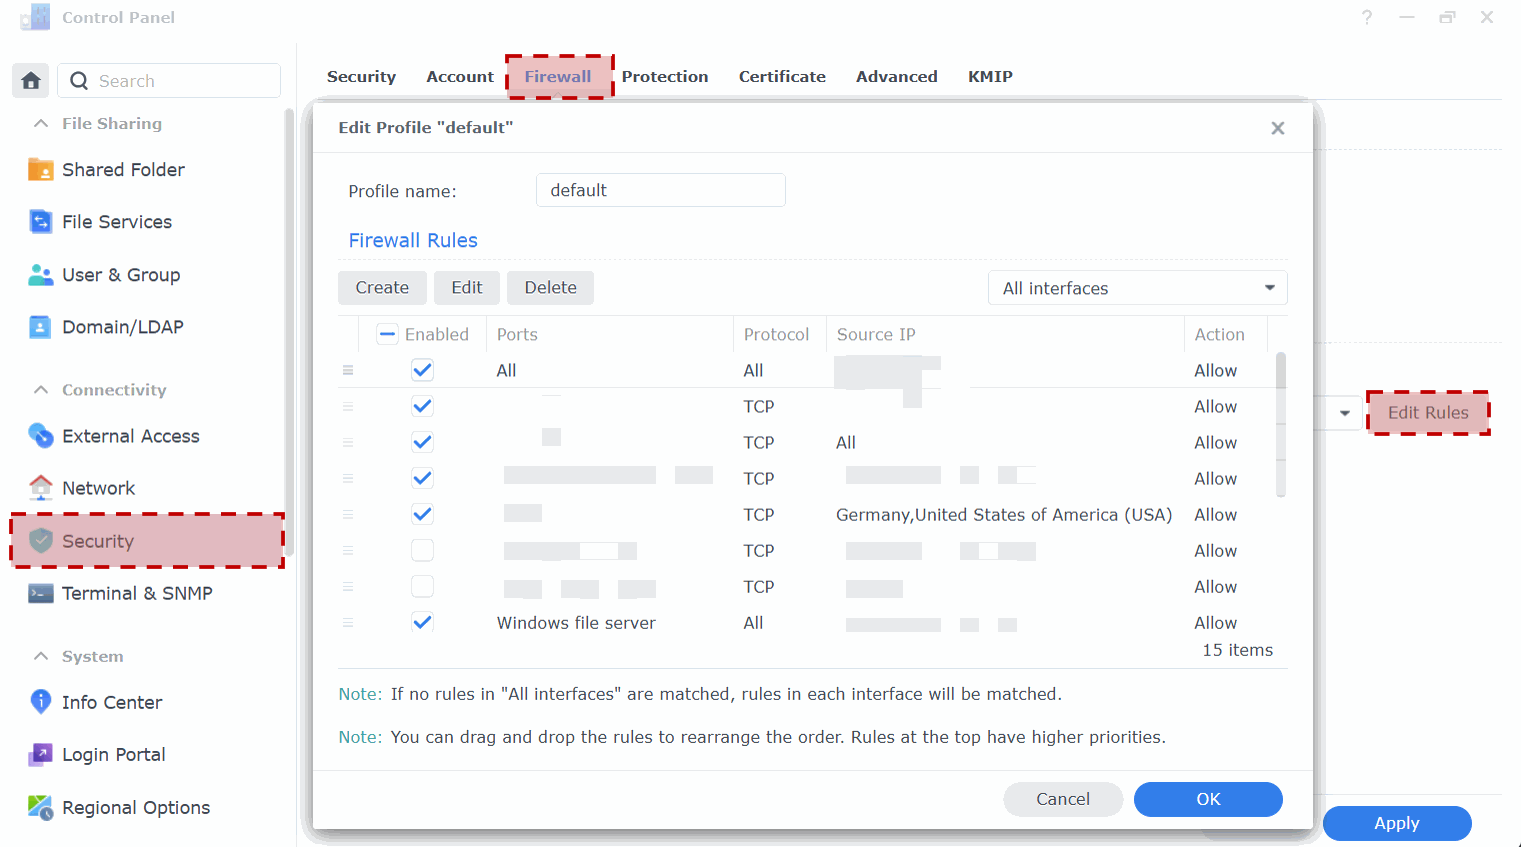
The Firewall tab controls which services can be reached from different networks. Use the strictest rules that still allow you to use the NAS. For example, allow SSH only from specific devices on your LAN, or restrict an internet-facing service to specific IP ranges.
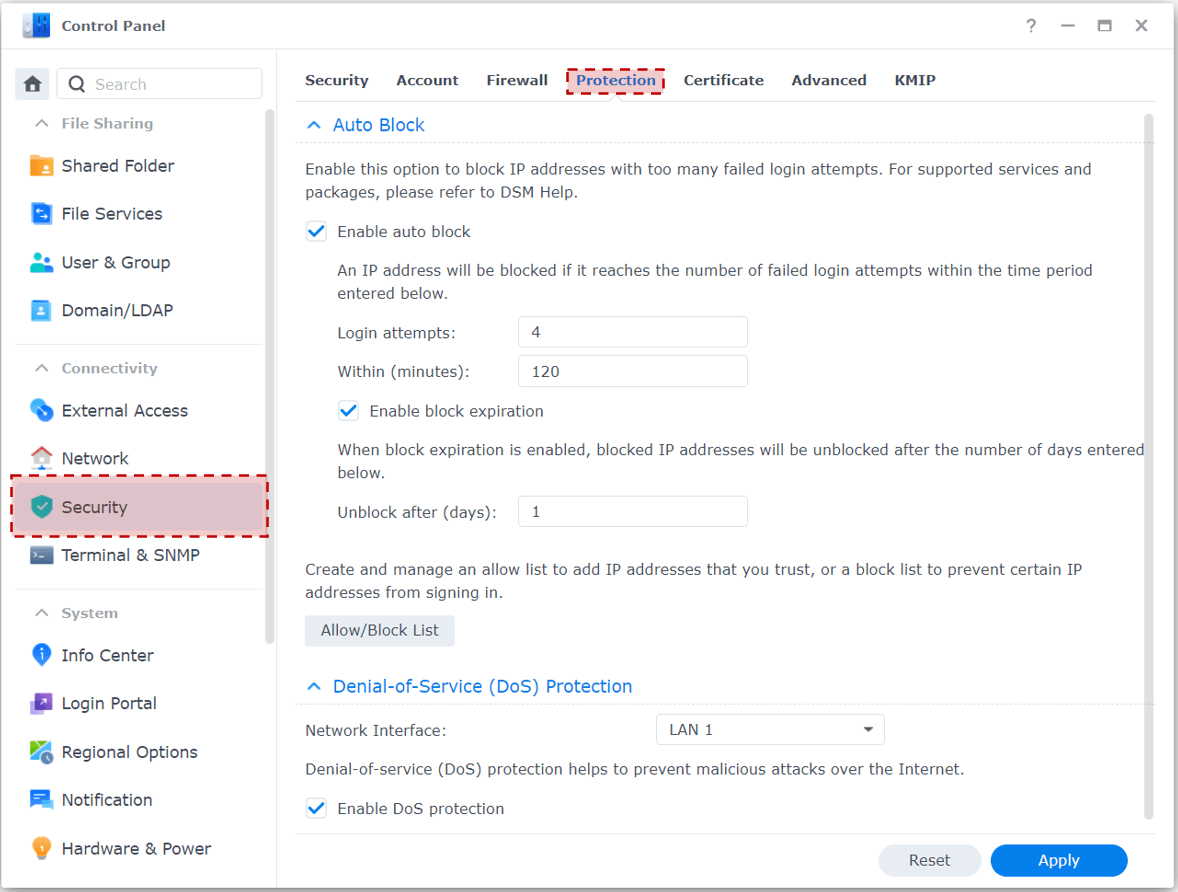
Under Protection, Auto Block blocks a source IP after repeated failed logins to a service. For example, you can configure it to block an IP for one day after 4 failed SSH attempts within 15 minutes. This is a useful basic defense against brute-force attacks. DoS Protection can reduce the impact of some flooding attacks against the NAS.
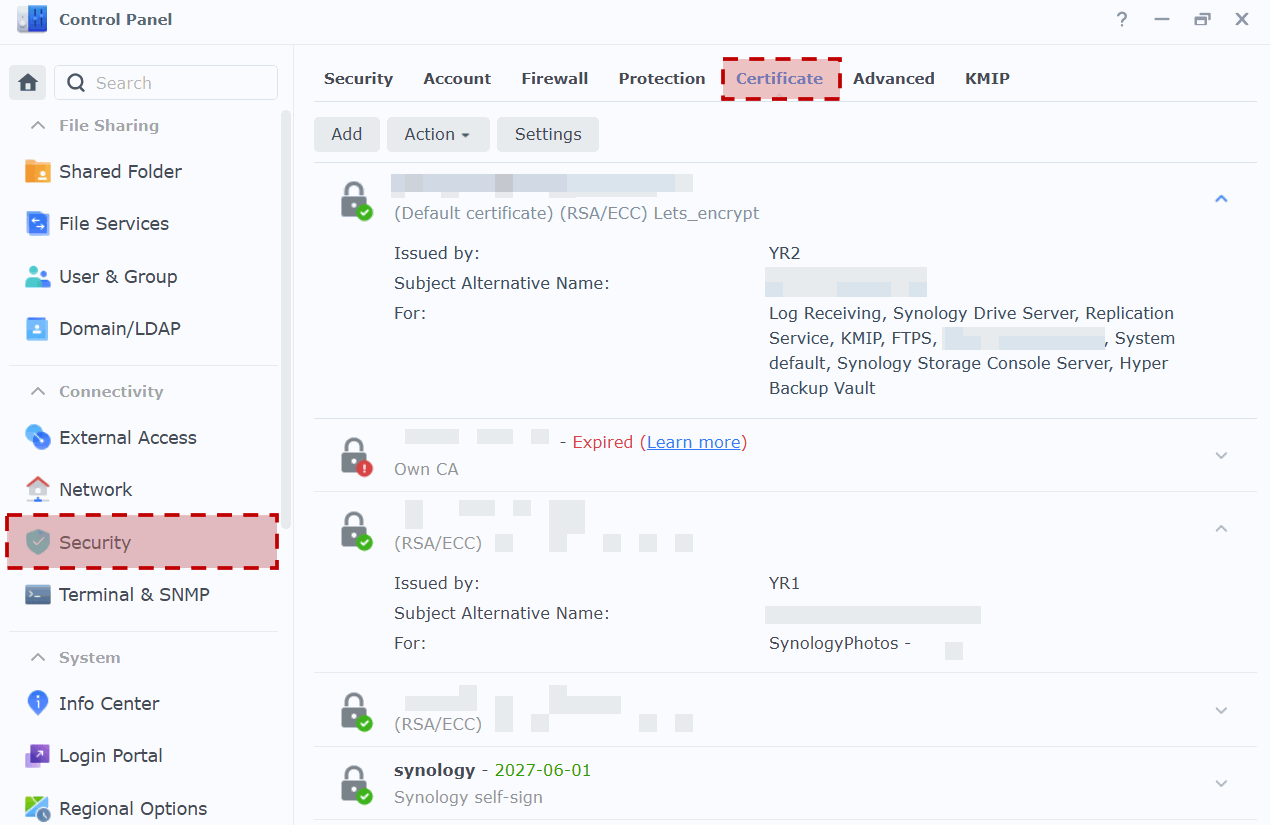
The Certificate menu manages TLS certificates — the backbone of secure remote access. You can self-sign, or use a certificate authority. Synology has a built-in option for a free Let's Encrypt certificate for your own domain or DDNS hostname (it needs port 80 briefly open for domain validation). These certificates are valid for 90 days, and the NAS can renew them automatically before they expire.
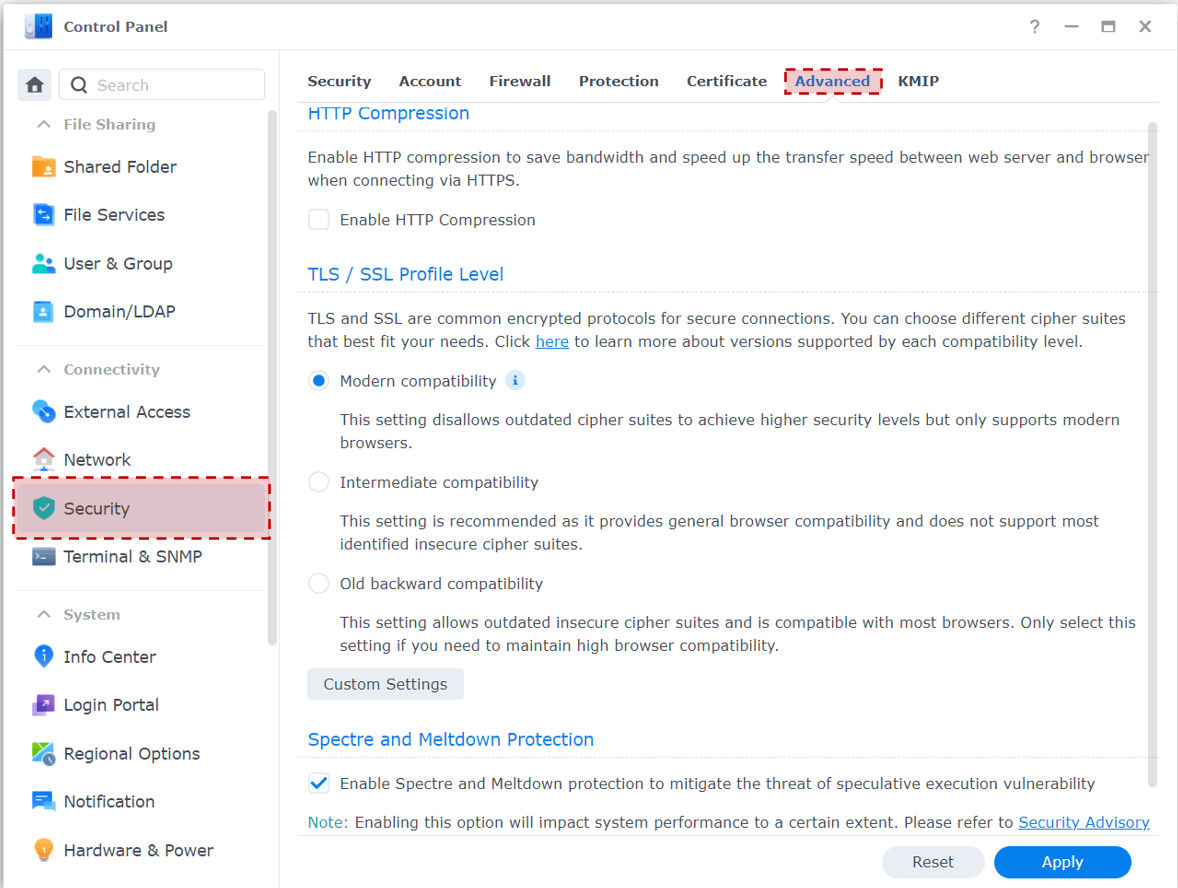
Under Advanced, the TLS/SSL Profile Level controls which TLS versions are accepted over HTTPS — if every client you use supports TLS 1.3, choose Modern compatibility. Don't forget to configure the profiles under the Custom Settings section either.
| Compatibility | TLS version |
|---|---|
| Modern | 1.3 |
| Intermediate | 1.3 / 1.2 |
| Old backward | 1.3 / 1.2 / 1.1 / 1.0 |
On NAS models with an affected CPU, you'll also see a Spectre and Meltdown Protection toggle. These are real, long-standing hardware vulnerabilities in many Intel, AMD, and ARM chips that can let malicious code read data it shouldn't. Enabling the mitigation closes the gap at some cost to performance.
Finally, KMIP (Key Management Interoperability Protocol) lets you store your volume-encryption keys on an external device, so the keys used to unlock encrypted data live only on a remote system — and the NAS itself can even act as a KMIP server for other devices.

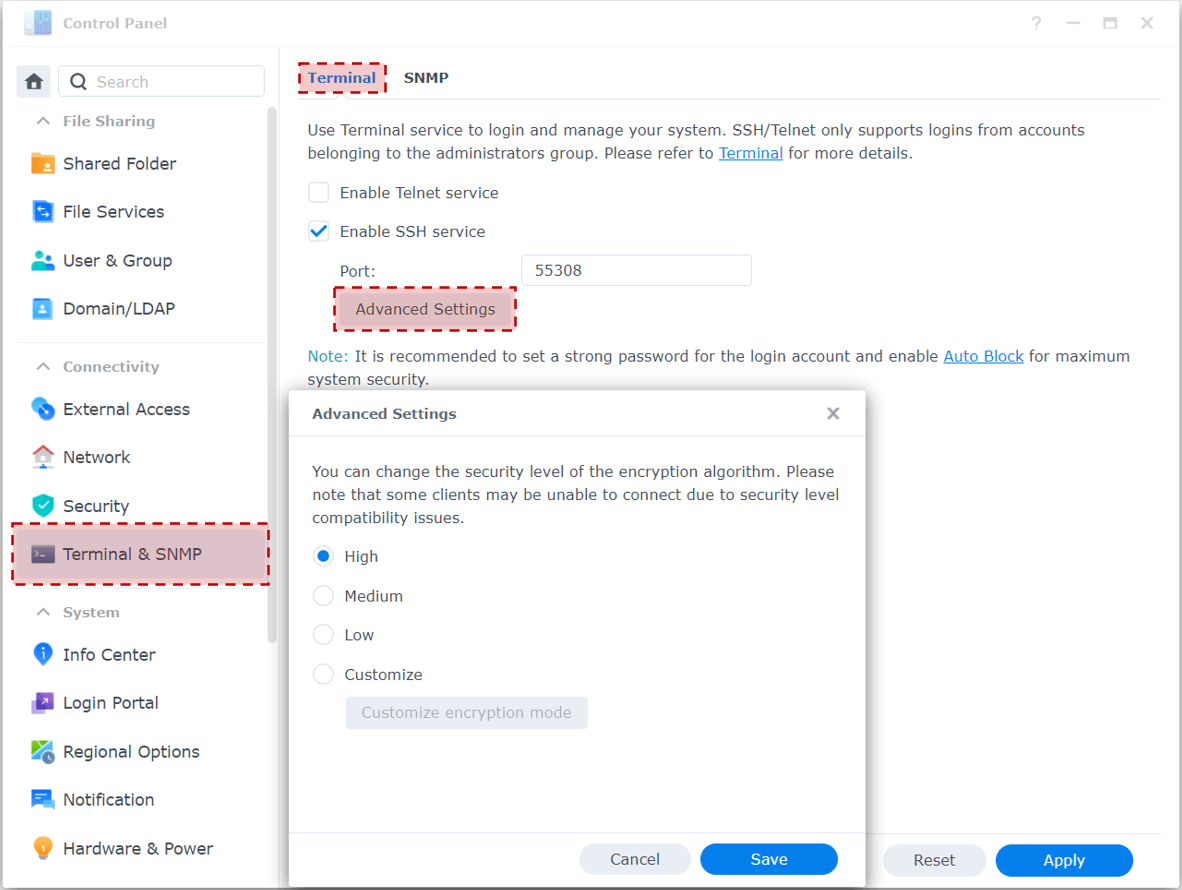
Terminal access may be necessary for system administration. Telnet transmits data without encryption, so it should be avoided. Use SSH instead if you need remote shell access. Never expose SSH directly to the internet because it will attract brute-force attempts. While this is not a significant hardening measure, you can change the default port 22. More importantly, under Advanced Settings, set the encryption security level to High.
SNMP is mostly used in business environments to monitor the NAS from network management software, and is less commonly needed in a home setup. If you don't use it, leave it disabled. If you do, use SNMPv3 — it supports authentication and encryption, instead of sending data in plain text.

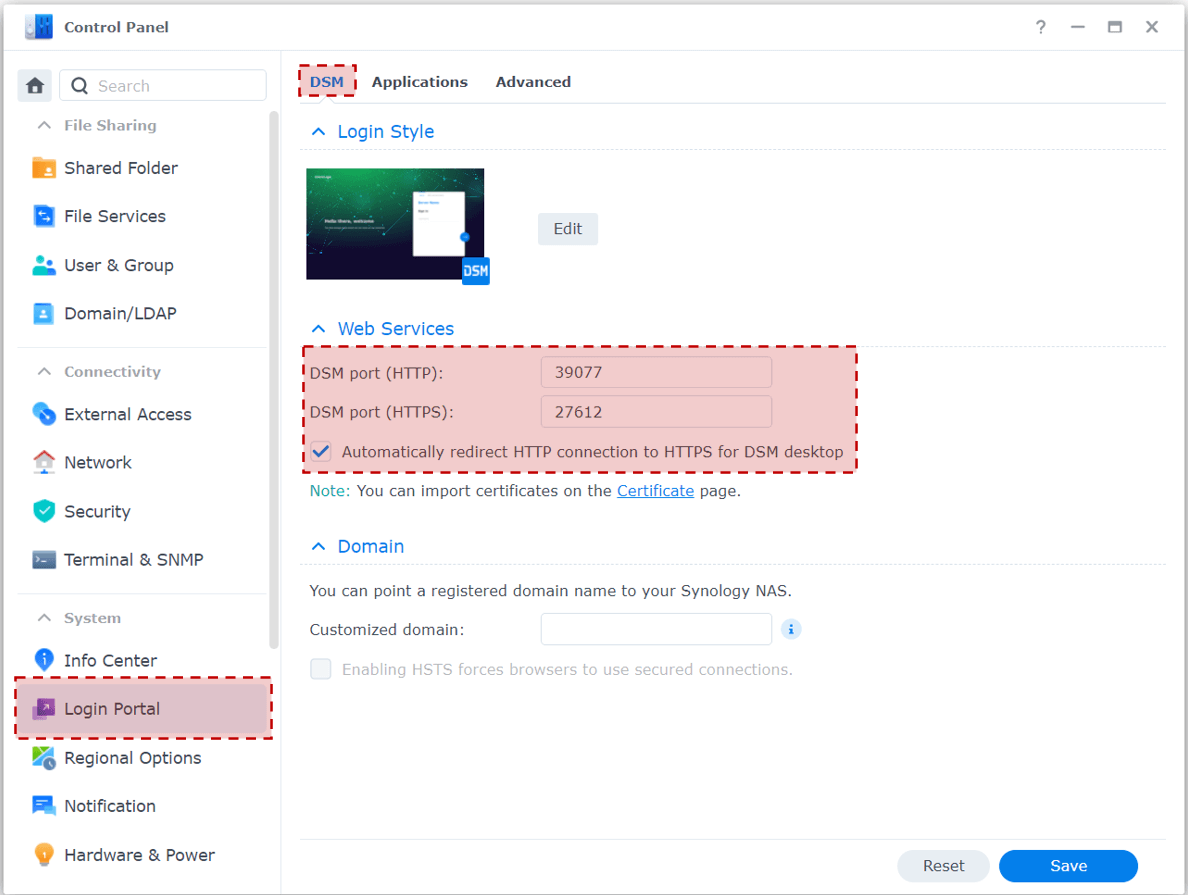
Under DSM, you can change the default HTTP/HTTPS ports. It is also recommended to enable "Automatically redirect HTTP connection to HTTPS for DSM desktop" so HTTP connections are redirected to HTTPS.
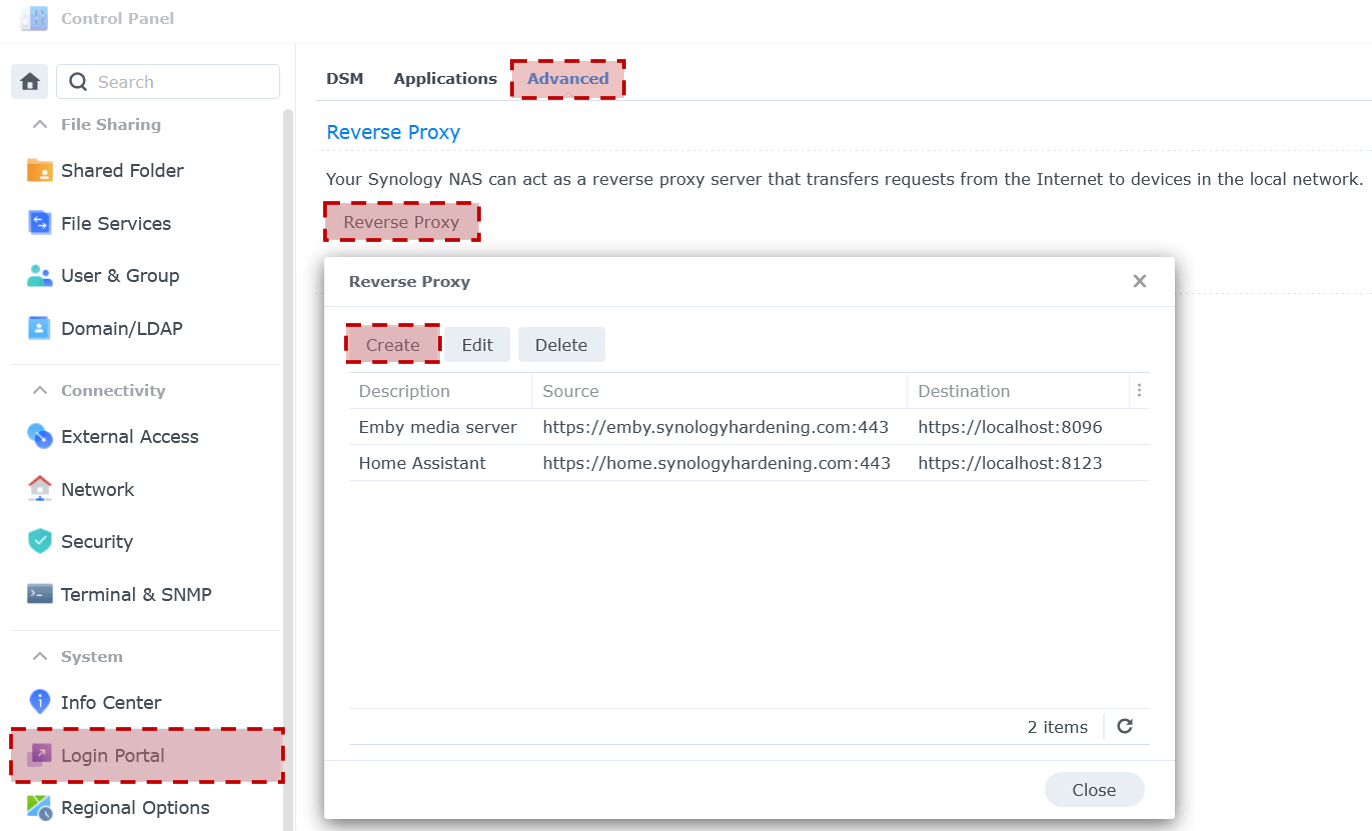
Under Advanced, you can configure a Reverse Proxy. This allows you to expose multiple services through a single port instead of opening a separate port on your router for each service running on your NAS.
For example, you can forward only port 443 to your NAS and use different domain names to access different services. A request to emby.synologyhardening.com can be forwarded to your Emby server, while home.synologyhardening.com can be forwarded to Home Assistant. Both services are accessed through port 443, while their own ports do not need to be exposed directly to the internet.
Using a Reverse Proxy does not make your services secure by itself. It mainly helps reduce the attack surface by limiting the number of ports that need to be publicly accessible. The services behind the Reverse Proxy still need to be properly secured, kept up to date, and protected with appropriate authentication.

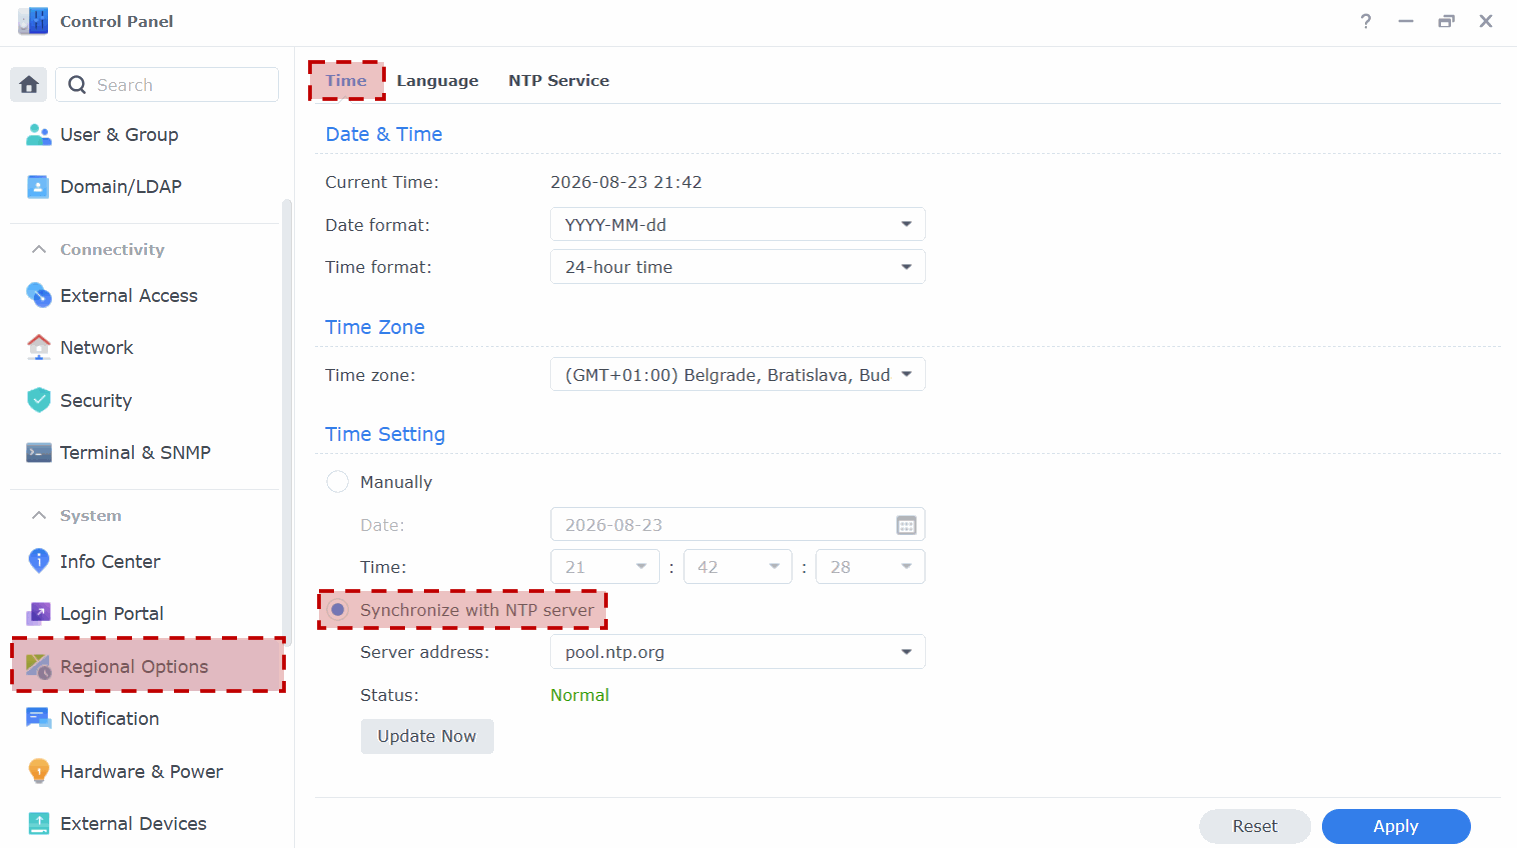
Under Time, use "Synchronize with NTP server" instead of setting the clock manually. Accurate time is important for logs and troubleshooting, and it is also needed for time-based two-factor authentication codes.

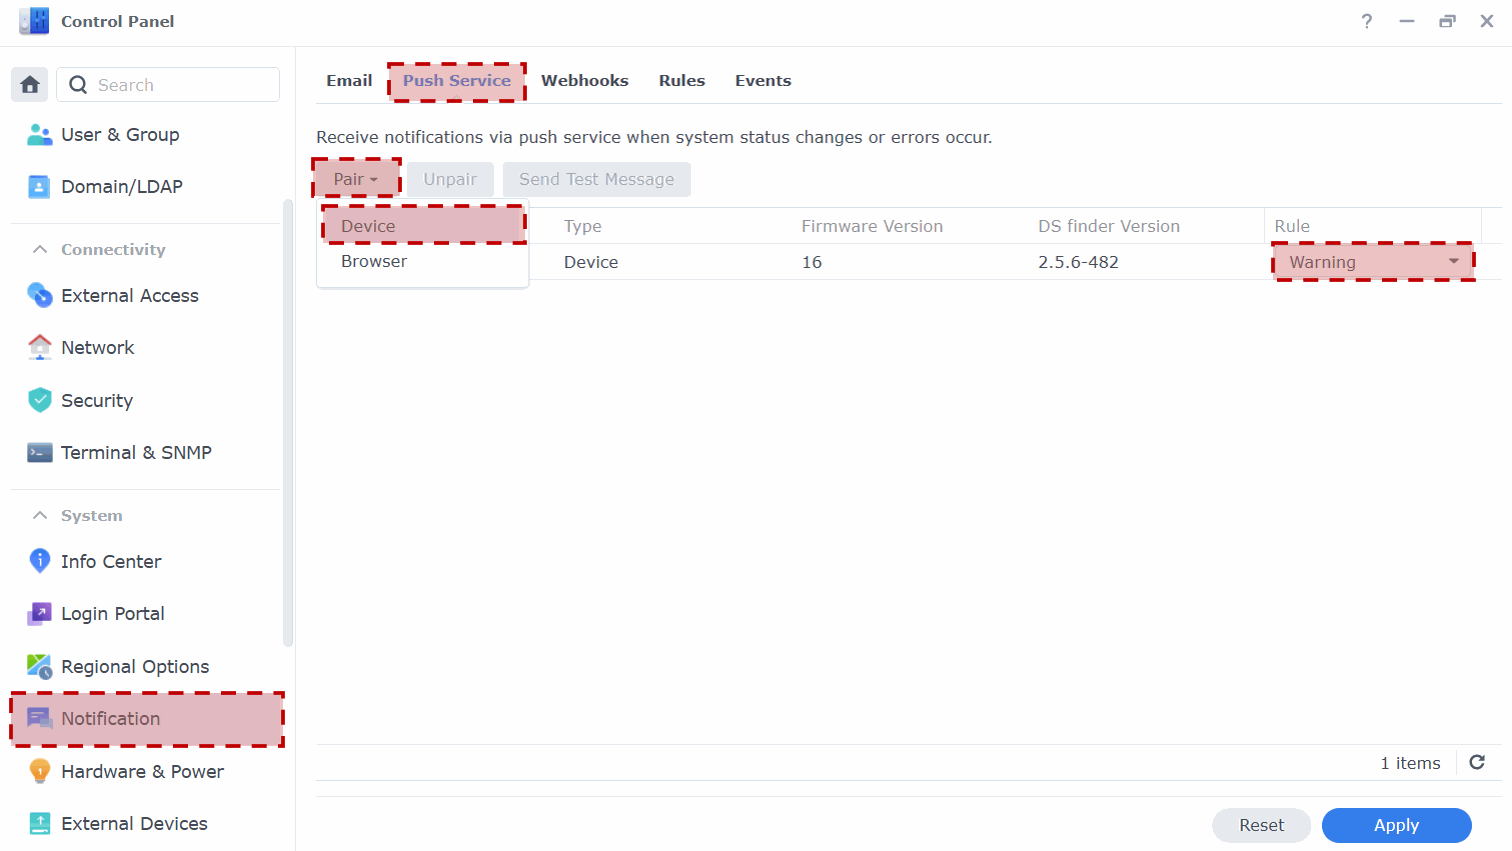
Configuring notifications is essential so you're quickly alerted to your NAS's state — a volume running low on space, a new DSM update, or a failed cooling fan, for example. Beyond email, DSM can also send push notifications straight to your phone via DS finder — pair your device under Push Service and pick which severity of events (e.g. Warning and above) should trigger an alert.

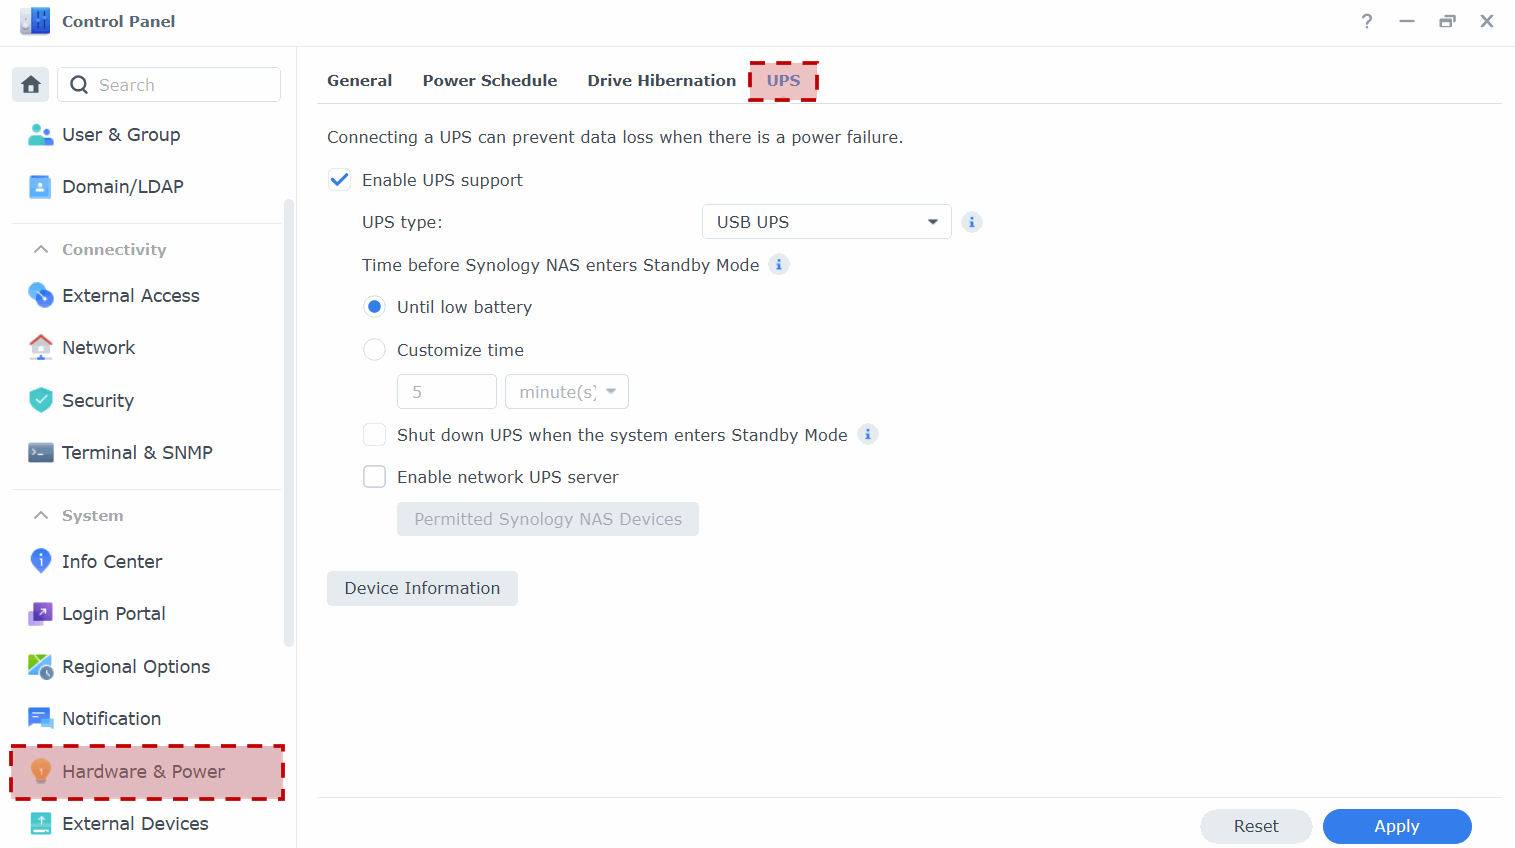
A UPS (uninterruptible power supply) prevents an unexpected shutdown during a power outage — which can otherwise cause data loss and isn't great for the hardware either. A UPS that reports its status to the NAS (typically over USB) lets you configure exactly when and how the NAS should react and shut down safely.
There are also a few simple physical security measures worth using. If your Synology has lockable drive trays, lock them to prevent the drives from being removed easily. A Kensington lock can also be used to secure the NAS to a fixed object, making it harder to steal.

It may sound like an IT security cliché, but installing updates is one of the most important steps you can take to protect your NAS.
If you do not update regularly, your device may eventually contain known security vulnerabilities that can be easily exploited by hackers.
If you skip updates for long enough, your device could end up exposed to known vulnerabilities that even script kiddies could exploit.
Under Configuration Backup you have two ways to back up your DSM settings:
A third option, if you'd rather not store backups on Synology's servers but still want automation, is a scheduled task running something like:
#!/bin/bash
/usr/syno/bin/synoconfbkp export --filepath=/volume1/DSM_backup/DSM_config_backup_"$(date +%Y-%m-%d)".dss
find /volume1/DSM_backup/ -mtime +30 -exec rm {} \;
That small script creates a daily backup and deletes anything older than 30 days automatically. Keep in mind these backups are not useful if they exist only on the NAS — you need them precisely when the NAS is in trouble. The script above also doesn't encrypt the output, so store those files somewhere safe and encrypted.
That small script creates a daily backup and deletes anything older than 30 days automatically. Keep in mind these backups are not useful if they exist only on the NAS — you need them precisely when the NAS is in trouble. The script above also doesn't encrypt the output, so store those files somewhere safe and encrypted.
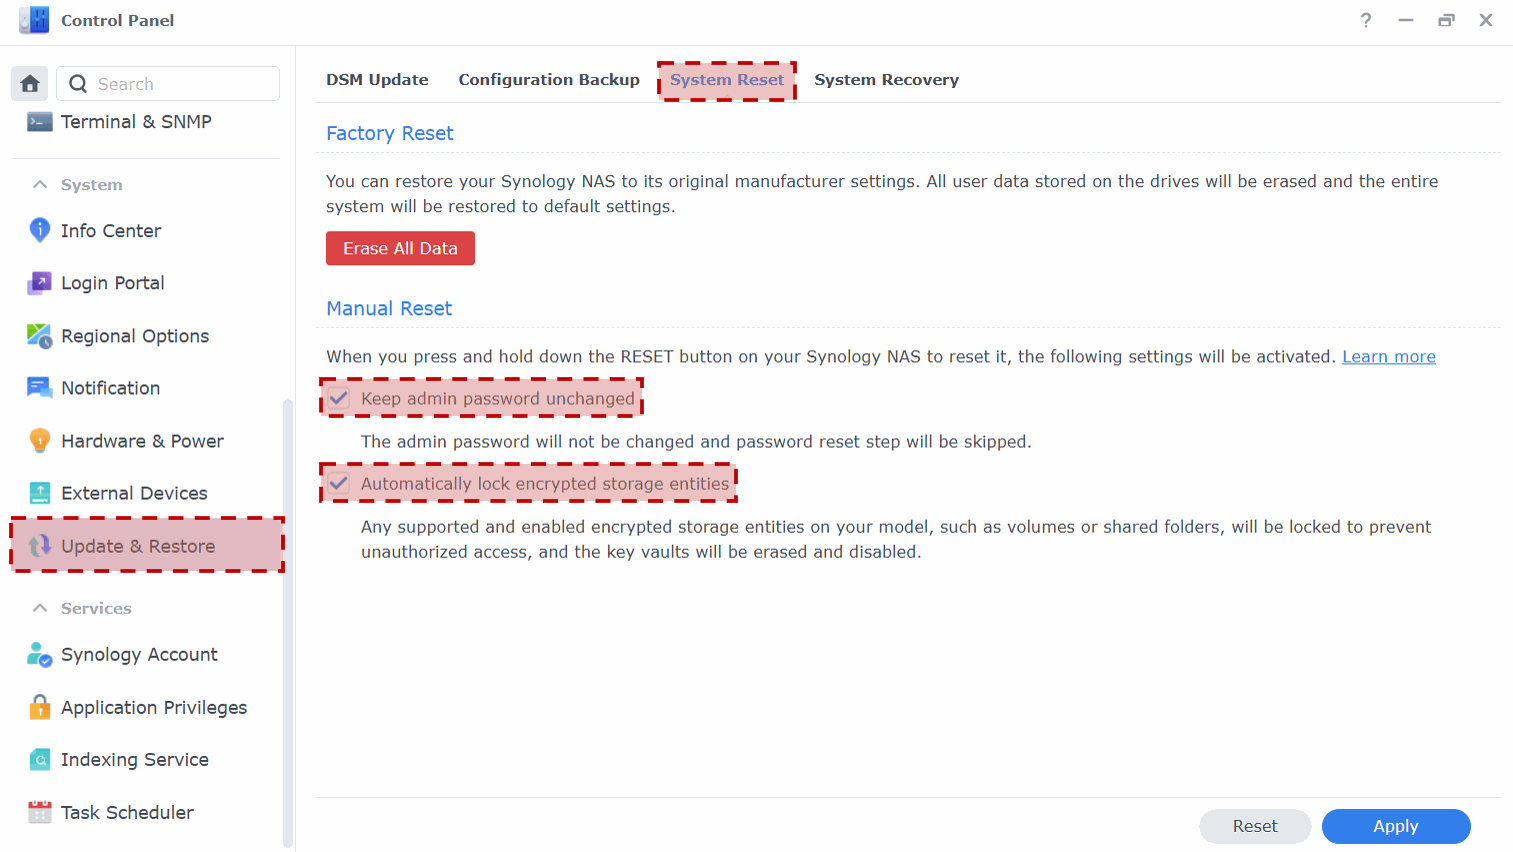
Under System Reset, enabling Keep admin password unchanged ensures that your admin password stays unchanged if someone ever resets DSM to factory defaults.
If Automatically lock encrypted storage entities is enabled, the encrypted storage entities will be locked and their encryption keys erased in such a case.

Controls which users and groups can access which applications — you can even restrict access by IP address or subnet. Each app's "Default privileges" setting decides whether new users get access to it automatically. The Permission Viewer gives you a handy overview of everything you've configured.
Plenty of packages can further improve your security. Here are six worth knowing.
General advice when it comes to apps: only install the ones you really need.

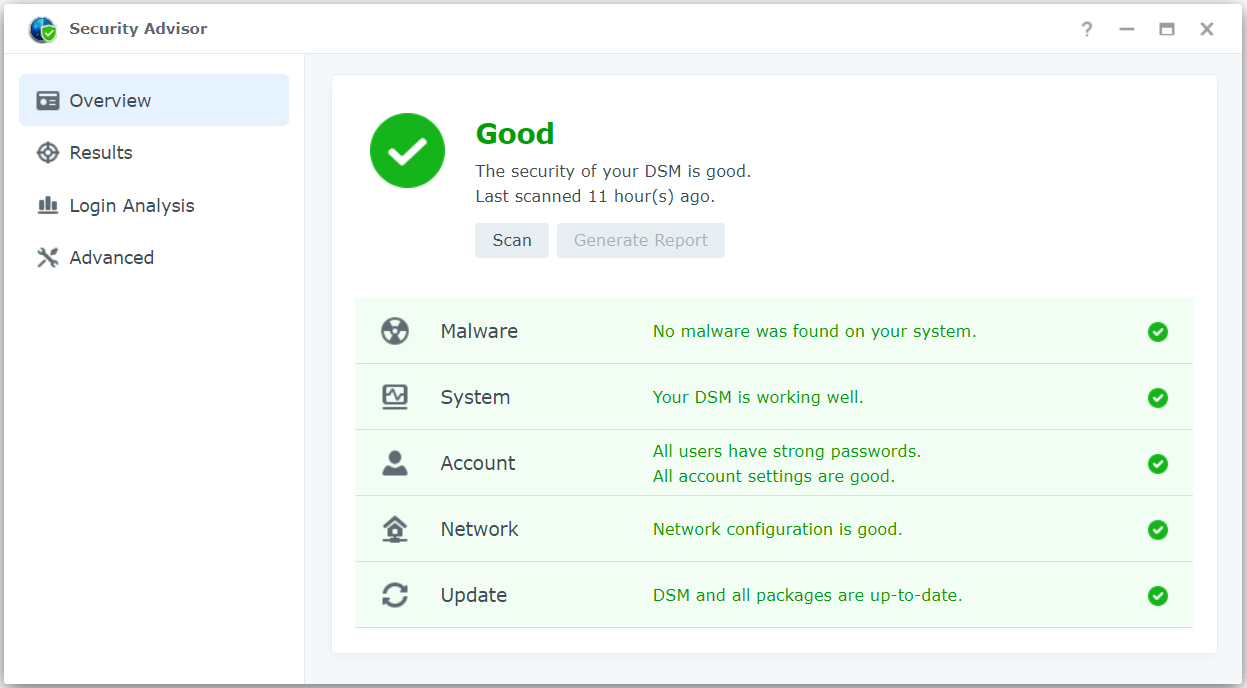
Checks your NAS for security risks, including malware and weak settings, and provides guidance on how to fix any issues it finds. Under Advanced you can choose which checklist it scans against, and schedule recurring scans. Very helpful security tool.

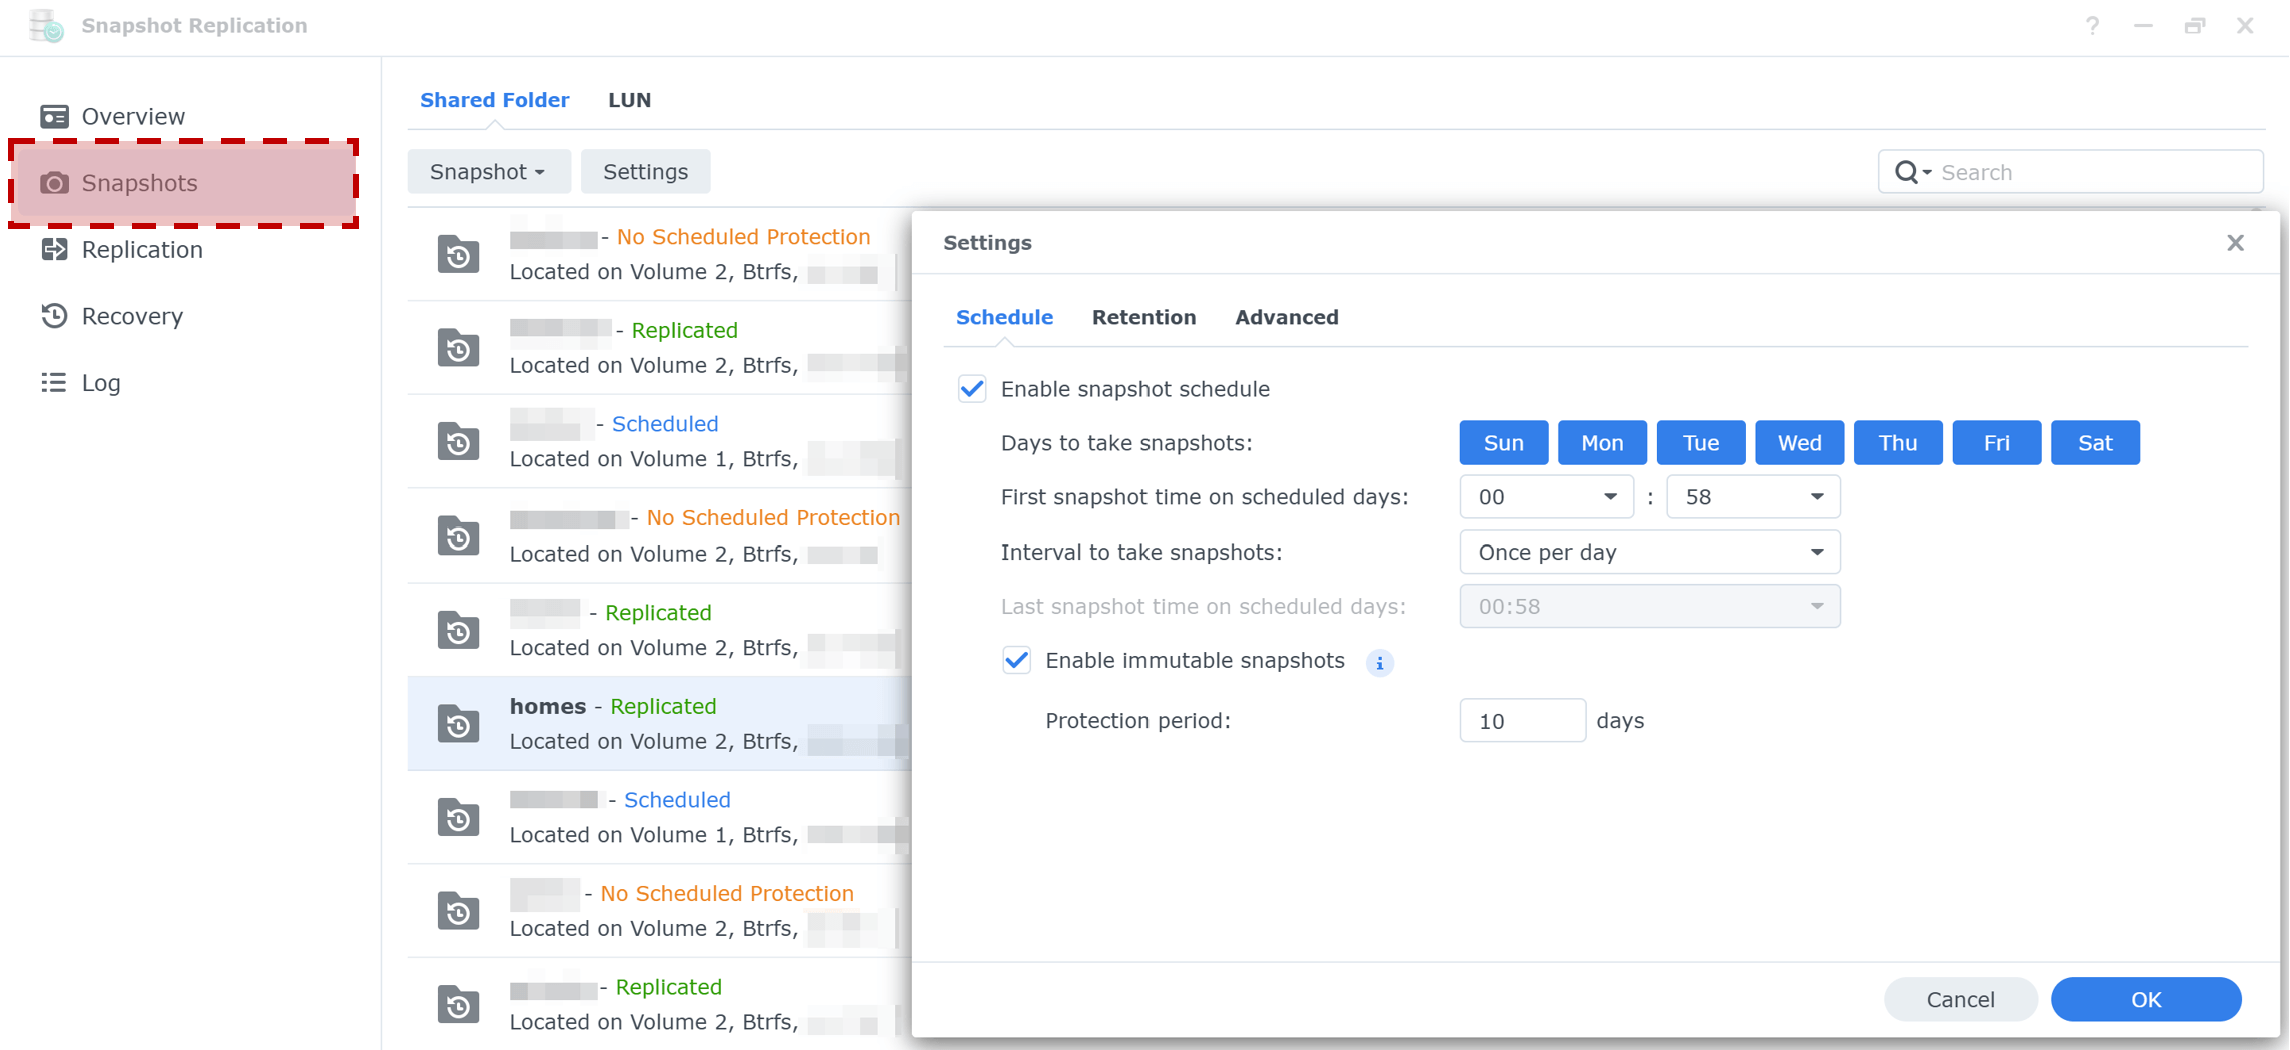
Creates point-in-time snapshots of shared folders, which can significantly improve data protection. Snapshots are especially useful when files are accidentally deleted or encrypted by ransomware.
Pick the folder to protect under Snapshots, then schedule snapshots under Settings. For important folders, enable "Enable immutable snapshots" — a WORM (write-once, read-many) style protection. Set it to, say, 10 days, and DSM will refuse to delete snapshots created within the last 10 days, making it much harder for even a malicious attacker to remove them. Note that a shared folder using protected snapshots can't be deleted or moved to another volume while they're active. The Retention menu lets you fine-tune how long snapshots are kept.
Under the Replication menu, you can automatically replicate locally created snapshots to another Synology NAS. This is a useful way to keep an additional copy of your important data on a separate device, providing extra protection if something happens to the original NAS.

Antivirus Essential and Antivirus by McAfee, both available from Package Center. Essential is free and runs on the ClamAV engine; frankly, it's not the strongest scanner on the market. McAfee is paid and broadly similar in functionality. Neither offers real-time scanning — both run on a schedule. Don't expect miracles from either, but running one won't make your system less secure.

A convenient way to back up files, applications, or your entire system — to another NAS, an external USB drive, a remote server, or a cloud provider (Google, Microsoft, Dropbox and more are supported). If the backup destination supports it, schedule regular integrity checks. Always send backups over an encrypted channel, and encrypt the backup itself on the NAS before it's sent.
Keep in mind that if an attacker gets into the NAS, the damage may not stop there — backups can be at risk too.
That's why it's worth using a backup solution with limited access to the data on the NAS — only enough access to create the backup.
Use a backup account with limited access to the source data, so a compromised NAS can't become a stepping stone to your backup storage. For extra safety, back up your remote backup itself with a separate tool. And periodically test that you can actually restore files — an untested backup only offers false confidence.

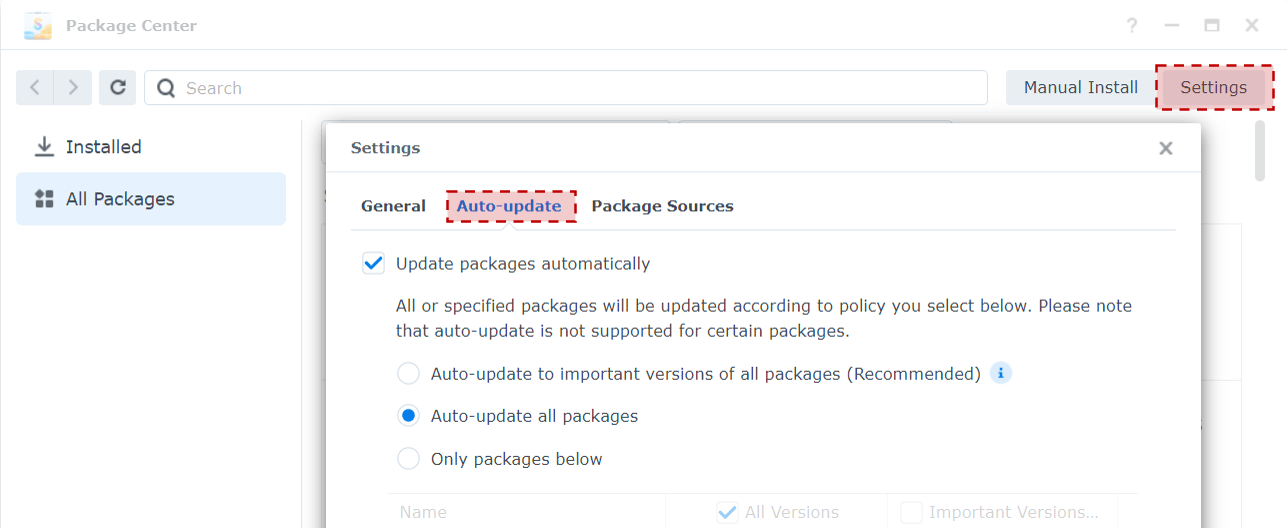
You can install countless packages from Package Center with just a few clicks. Install from here whenever possible, and never from untrusted external sources. Keeping installed applications up to date is just as important as keeping DSM updated. Configure this under Settings → Auto-update.

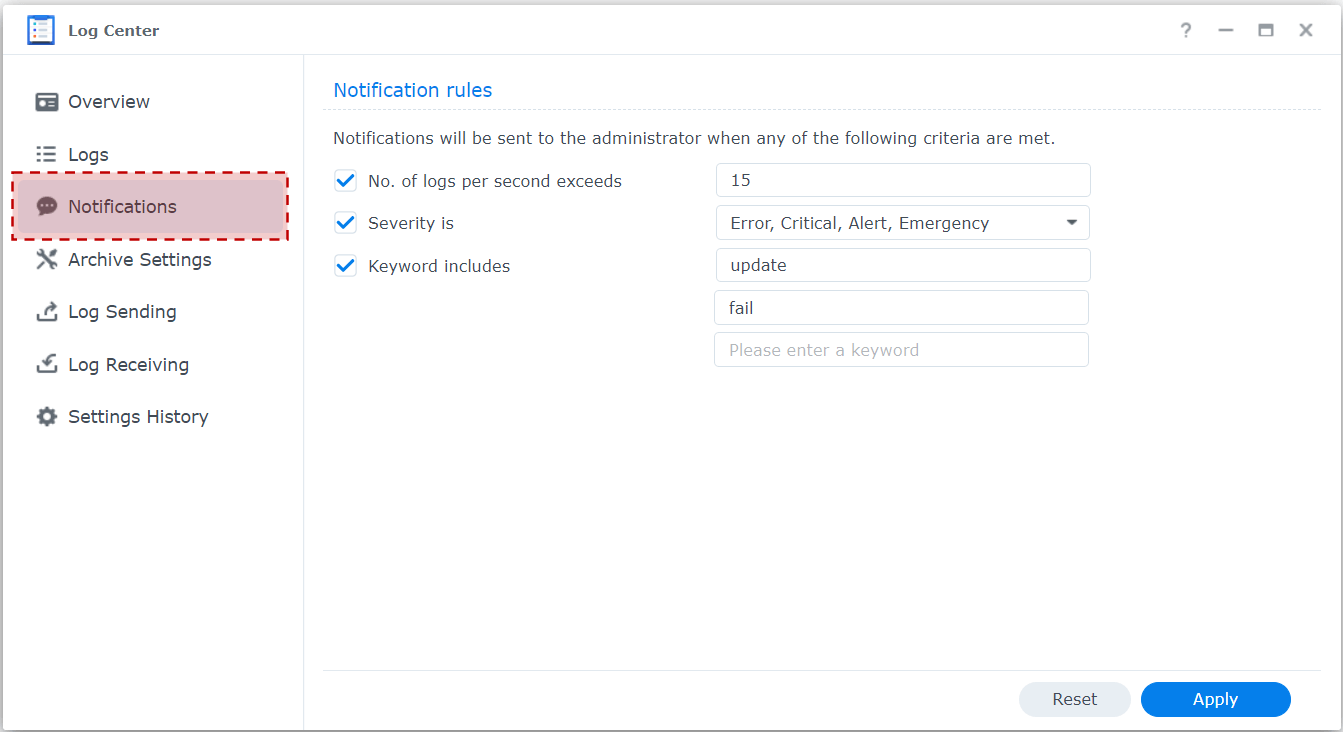
Log Center records events that happen on the system. To receive alerts about failed logins and package updates, set keywords such as "update" and "fail" under Notification. This can make even a single failed SSH login trigger an alert.
Did you manage to make your NAS more secure?
If so, please support my work with a coffee :)
Security hardening is essential if you want to actually increase the security of a system.
Even though this guide turned out fairly long, there's still plenty of ground I could only touch on briefly, or not cover at all. Building and running a secure system is a long, never-ending process — the goal is to find the right balance between being overly paranoid about security and completely ignoring IT security best practices. If you do not configure everything in this guide, these ten habits alone can still improve the security of your Synology NAS. Check them off as you go.
Tick off the rules on the left. Your progress is saved locally in this browser only — nothing is ever sent anywhere.
 Balint
I'm a cybersecurity engineer and a long-time Synology NAS user. I believe in the importance of private cloud solutions and protecting our data. That's why I decided to share my knowledge with you on how to properly secure and configure your Synology NAS.
Every tip and piece of advice on this site was written by me. AI was used to build the website and translate some of the text.
Did you manage to make your NAS more secure?
If so, please support my work with a coffee :)
 synologyhardening.com